 You may find many ways to configure an AWS EC2 Instance and deploy an executable jar-file to this instance. To configure an AWS EC2 Instance you should go through several steps including setting up secured access. In this post we will describe a simplified way how to quickly:
- Launch an AWS EC2 instance
- Deploy an executable JAR with a decision service to this instance
- Test the deployed service remotely.
We will use the same executable jar-file “VacationDaysSpringBoot-1.0-SNAPSHOT.jar” that we already created in the standard OpenRules Decision Manager sample project “VacationDaysSpringBoot” – see this post.
Step 1. Launching an EC2 instance. Login to the AWS Management Console and select the the menu “Services” and find “EC2”. Then click on “Instances”, and then on the button “Launch Instance”:

Select the first suggested instance “Amazon Linux 2 AMI (HVM), SSD Volume Type”. Then choose an Instance Type, e.g. “General purpose, t2.micro, Free tier eligible”:

Click on the button “Review and Launch”. From the next screen select “Edit security groups”:

On the next screen click on “Add Rule” and modify Port Range as 8080:

Click on “Review and Launch”. You will receive a warning to improve your security as this security group is open to the world. It’s OK for a quick demo, but for the real application the secure access should be properly configured in AWS. You will see the following screen:

You need to select “Create a new key pair” and give it a name, e.g. “demo-key”. Then click on “Download Key Pair”. It will download for you the file “demo-key.pem” that you should save into your home directory “c:\Users\yourname\.shh\”.
Click on “Launch Instance”. Your new EC2 instance will launch after a brief delay. Click on “View Instance” to see your running instance in the screen similar to this one:

Step 2. Memorizing Public DNS. At the bottom of this screen you will see the tab “Description”, from which you should select and copy the Public DNS of this instance and save it for later:

Now click on the button “Connect” and you will see
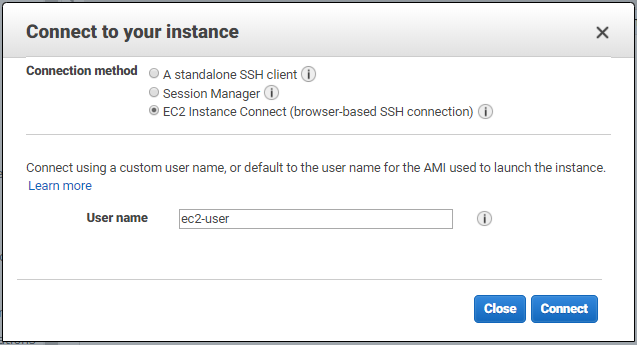
Step 3. Installing JDK 1.8 at the EC2 instance. Select “EC2 Instance Connect (browser-based SSH connection)”, enter the User name “ec2-user”, and click again on “Connect”. It will open a console with a prompt:

In this prompt, you should type
$ sudo yum install java-1.8.0-openjdk
It will install JDK 1.8.0 at this instance.
Step 4. Deploying Decision Service to the EC2 instance. Now you should open FileZilla, and select Edit+Setting. From this dialog:

Select SFTP and “Add key file”. Then browse to choose the file “demo-key.pem” that we previously saved in the your home directory “c:\Users\yourname\.shh\”. Then click OK. Now you can open a new connection in FileZilla with the following parameters:
- Host: sftp://ec2-3-80-234-146.compute-1.amazonaws.com (use the actual Public DNS of your EC2 instance saved previously)
- Username: ec2-user
FileZilla will open this connection and you will be able to select our jar-file “VacationDaysSpringBoot-1.0-SNAPSHOT.jar” on the left and upload it to the remote folder “/home/ec2-user” on the right.
Step 5. Starting Decision Service. Now our EC2 instance is ready to start a server with our service “vacation-days”. To do this, go back to the already opened console and enter the following command:
$ nohup java -jar VacationDaysSpringBoot-1.0-SNAPSHOT.jar > log.txt 2> errors.txt < /dev/null &
It will start our decision service at this EC2 instance. We can test it as we did previously.
Step 6. Testing with POSTMAN. Let’s start with POSTMAN:

Now we use a new URL http://ec2-3-80-234-146.compute-1.amazonaws.com:8080/vacation-days with the Public DNS of our instance that we memorized in the Step 2. The input data is the same. The results were produced within 36 milliseconds.
Step 7. Testing with Java. Similarly, we can run the same test from the Java class /src/test/java/vacation/days/spring/TestLocalServer.java by only replacing decision service’s endpoint with the one used in the Step 6:
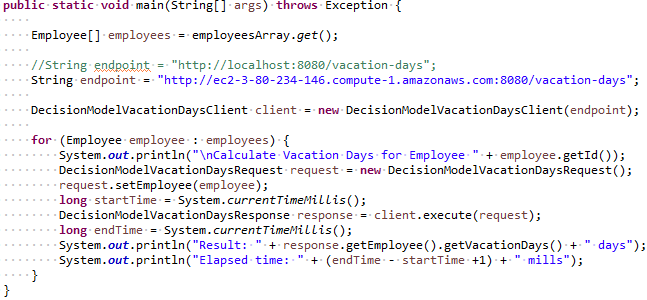
We will receive the same results when we ran it against the local server.
Redeployment. When you make changes in your business decision model and re-generate your executable JAR, you don’t have to repeat all these steps. You only need to start FileZilla with the same connection and upload the modified jar-file to the same remote folder “/home/ec2-user”.
